1. General Review on Key Performances
Metering
The metering accuracy of my Olive K-m is in general acceptable although there is still some tendency of underexposure. The 16-segment multi-pattern metering (called the Matrix thereafter) is in fact quite heavily centre-weighted and its intelligence is really mediocre, or indeed just lack of. Nonetheless, I found that the new 77-segment pattern metering of the K-7 is even worse as it is just too sensitive to highlights and being too conservative, e.g., even though the highlights are at extreme corners and constitute only a small area of the frame, those unimportant parts are heavily weighted whereas the main areas of interest are underexposed.
To get best consistency and accuracy for metering with my K-m, I use the Matrix with +0.3 EV compensation as my default setting, which will give more centred histograms for mid-tones (I have verified this with my standard exposure accuracy check with My Exposure Accuracy Test Chart). In fact, the metering results will not be much different for most of the time even if the Centre-Weighted Average Metering is used (but it seems that the Matrix is just a little bit more flexible). Furthermore, and it is quite important, for more accurate metering, I enabled "the AE Locked when AF Locked" Custom Setting so that I do not need to press the AE Lock manually each time when I recompose the frame off-centre (will discuss more below for the technical reasons behind and why this is needed).
In fact, underexposure is the biggest enemy for digital photography as it promotes noise. My imposed +0.3EV compensation not only helps to resume more correctly exposed pictures in brightness, it also improves noise performance of the pictures, overall speaking, especially for the shadow areas. Do not worry too much about overexposure and highlight clipping, which is not an easy thing to happen even with that small amount of +ve exposure compensation for *Pentax DSLRs*, as there is always margin (for their underexposure tendency)! Indeed, -ve exposure compensation with Pentax DSLRs is rarely needed. Having said that, I still would say that the K-m is the only Pentax DSLR model made so far in the Pentax land with the least underexposure tendency, which I found to be better than the K20D and the K-7 and my K100D, DS and original *ist D which I had been using for long.
Btw, if you prefer to use 1/2EV stepping, the camera will change to +0.5EV when the option is changed. With +0.5EV, the pictures will be exposed more to the "Right" than centred, against +0.3EV, which is +1/6EV more for the exposure. As such, more care should be taken for not to burn the highlights for the subjects/areas of interest if a +0.5EV exposure compensation is applied. Nevertheless, if you want overall a bit lighter and brighter pictures and/or the scenes involve more high key tones, it still maybe a good idea to impose the +0.5EV exposure compensation as the default value (but as I've just said, great care should be taken - watch out the histogram and the highlight clipping warning!)
Focusing
The AF is in general accurate with a variety of Pentax AF lenses of mine, except at low to very low light where the reliability of the AF system drops (will discuss more below). Speed is acceptable but actually still not very fast (the fastest AF is achieved with the kit lens as the AF running throw is short for typical focusing distance, e.g., from infinity to 1m). My 1999 once bottom-of-the-line MZ-30 film AFSLR of Pentax is surely still faster and more decisive. At low light, my K-m still hunts but far less than any Pentax DSLRs of K20D and before (see this previous experiment by other here). My K-m's focusing speed, with AA Lithium batteries, still by no means can catch up with my Canon 5D with just the cheapest EF 50/1.8 II which is equipped with Canon's lowest end Micro Motor for AF. With true Ring-type USM on 5D, it just blows the K-m (and any Pentax DSLR actually, and of course K-7 is of no exception) out of the water just too easily, especially when the light level of the environment and/or contrast level of the objects drop.
Well, some people will start to argue that the K-m is an entry-level camera body. But my experience is that the K-7 is actually not much faster in AF and the AF behaviour, responsiveness and performance are actually quite similar between the two. The K-7 is somehow faster but it by no means can match the Canons (and of course the mid-class to high-end Nikons as well). So, will using using the SDM help? I bet as many of the Pentaxians have now known, SDM will only slow down AF speed and timing and its performance is just lower! Just do a simple search at my Blog here for all the evidence if not convinced yet.
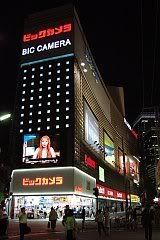
Last but not least, I think I should point out that the AF under low light is still not reliable as it should be, especially if wide AF area is chosen, i.e., all the 5 AF points are enabled. For night scenes, occasionally but from time to time, I got totally out-of-focus images when the AF was achieved with AF points other than the central one (see the example below), which actually is exactly what I found with my *ist D, DS and also the K100D (with illustration). The K-m is still of no exception. In view of this, I believe there must be some issues deeply associated with the SAFOX VIII system which causes the problem, but it seems that the technical issues never got resolved - a real disappointment.
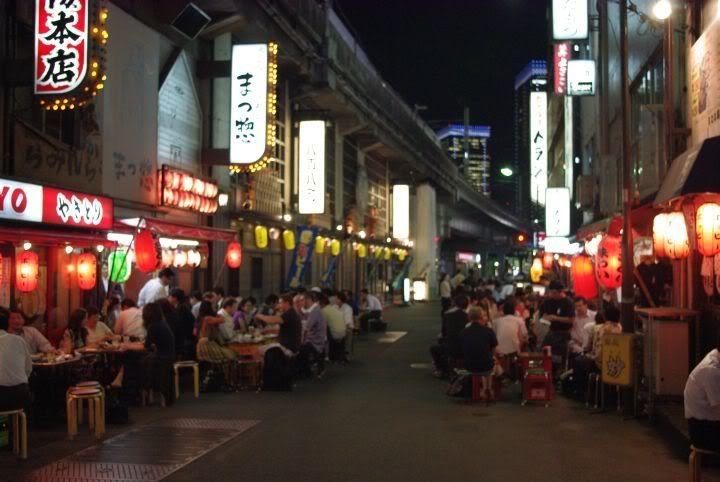
Finally, if you just encounter focusing errors (Front Focusing or Back Focusing) under normal circumstances with faster lenses/wider apertures on your K-m, you may wish to try the Debug Mode to enter a correction factor (detailed instructions here).
Image Quality
The IQ of the in-camera JPEGs is very high with appropriate settings (you can have a look at some of my quick previous samples with 100% crops here). Whilst the JPEGs are of good colours and high resolution, pixelisation is quite visible and I think it is just a trade off to get “sharper” images and it also shows the weakness of the demosaic algorithms used by the K-m's image engine. As for RAW, if the RAW files (PEFs) are to be processed and converted using the original Pentax Photo Laboratory 3.6 (which is bundled), very “Soft JPEGs” are resulted (See this for more details and shootout samples).
White Balance
The Auto WB of the K-m has been much improved than previous Pentax DSLRs. From my own experiences that it is better than the K20D. At least under most natural light conditions, the colour balance results are good. For artificial lightings, the results are more or less close to what my eyes see, with some little errors and colour casts. Usually, it would not correct the whites to “whitest”, but the results are acceptable and I could see that the camera tries to preserve the ambient atmostsphere. In particular, the AWB actually works well with white fluorescent lightings than with tungstens, with which the produced pictures will still look yellowish/orangish (whilst with preset tungsten Manual WB, it produces magenta cast).
One more thing that I don't like the preset Tungsten Manual White Balance is that its chosen colour temperature is just too low and as such the pictures look just too cold, than the previous Pentax DSLRs.
For Manual WB, there is no option to input the Kelvin value of the colour temperature directly at the K-m, the fine adjustment of the G-M/A-B doesn't help much and IMO is not much useful and it is not so straight forward to use (although this can be enabled in one of the Custom Settings). A manually input K value will be the easily way to control colour temperature manually for many circumstances.
P-TTL Accuracy
What I can say is that the P-TTL accuracy of the K-m (with the built-in flash) has been improved, although sometimes it still underexposes, but the occurrence and the amount far less than it was before with other previous Pentax DSLRs.
2. Tips and Tricks – My Own Best Settings
General Operation
The back LCD will be turned on all the time by factory default whenever any button is pressed or the shutter release button is half-pressed. When doing the AF, the screen display will be turned off momentarily. To save battery power, the LCD can be turned off all the time in a Custom Setting, but the user will be required to turn it on by pressing the INFO button each time before viewing the neccessary information for carrying out any operation. The LCD turned on time is the same as the metering operation time as defined by yet another Custom Setting.
When the LCD operation status is displayed, press the OK button will get quick access to the most common settings and functions, see the screen captures below:
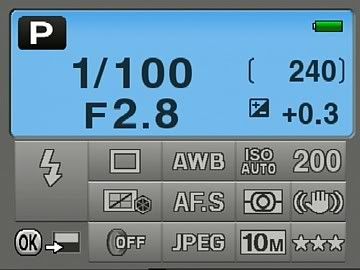

As for the first four setting items at the top, they can also be directly accessed using the Four-way Buttons at the camera back anyway. One thing should be noted is that there is no quick access method to change the AF area, which must be selected via the Menu (Recording Setting Page 2, Sub-item 3 - the Screen Capture can be found a few paragraphs below).
Custom Image and Parameters
After various testings by shooting different subjects and scenes under different conditions, I select the following best settings of my own for general shootings in most cases:-
Image Tone: Natural (I prefer more natural and true-to-life colour rendition and reproduction)
Custom Image Parameters:
Saturation -1: As it is just too saturated at 0 even for the "Natural" Image Tone.
Hue 0: There is no reason to change this and the default is neutral.
Contrast +1: The default Zero setting does not have enough contrast, at least this holds true for most of my Pentax lenses, digital or film ones. The lower contrast is actually related to the use of Shadow Compensation which is activated by default.
Sharpness set to the *Fine* Sharpness -1: The sharpening level at 0 is just a little bit too much. And, normal Sharpness instead of "Fine" is just too coarse to be usable.
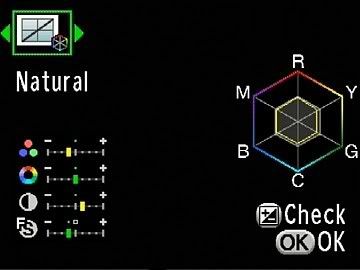
In fact, without Fine Sharpness, the default "Sharpness" (actually it is just "sharpening") produces artifacts that are just too visible and resolution is decreased somehow, too. Fine sharpness is not perfect, though, as it increases noise at high spatial frequency areas and make pixelisation more visible when the pictures are viewed more closely. As another not-so-important remark, the “Fine Sharpness” and “Sharpness” shares the same stored value. So, if you are to toggle between the two (using the e-Dial) and do wish to use different settings for each of them, some more care should be taken.
Colour Space
As usual, sRGB is my choice for better compatibility and directly usable images for printing, with a wide choice of different output devices and better software support. My recommendation is that unless you really need to do editing with special photo editing software and printing applications/devices, the (just a little bit) extra colours that the AdobeRGB could record won't worth the troubles and inconvenience that might get involved.
AF Mode, AE Metering and AF Point
Just see this screen capture and you can known what I select:
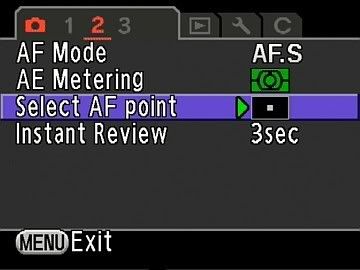
AF-A (A for Auto) is not a much workable mode practically as AF re-composition is often not possibly. I use the classic AF-S by default and choose the default Matrix Metering (but classic CWA Metering is close anyway for the obtained results) I use the Central AF point most of the time (unless in AF-C with running objects off-centred or I give the camera to some “laymen” to shoot). Furthermore, as I always do AF and re-compose and I the Matrix Metering is just *heavily* Centre-Weighted, I also enabled the Custom Setting of “Lock AE when AF Locked so that the whole operation is seamless and easy and all the things are achieved by one-touch (which is not possible with Canon DSLRs as there is not such a flexible option in the Canon land).
Shadow Compensation
Turning it on (by default, one of the Custom Settings) will help to lift up and bring out more shadow details. The Dynamic Range is improved. However, it will decrease the contrast for images under some conditions and more importantly more shadow noise are brought out too and noise level increased – Well, there is just no free lunch on Earth!
Noise Reduction
In order to suppress the noise that are brought out both by the “Fine Sharpness” Sharpening *and* Shadow Compensation, I turn on the Noise Reduction and choose the Weakest setting. The effect of elimination of noise can be seen even at ISO 200 and the effectiveness is good – noise is smoothed out and loss of image details is very minimal. I do not recommend to choose higher settings though as I found that they could be somehow more strong and some image details would be lost.
Unlike the K-7, there is no option for the user to choose the starting ISO speed for the NR. The K-m actually applies the NR for all ISOes whenever noise comes up. But on the other hand, I would say the K-7 is a camera which needs NR for *all* ISO speeds more than the K-m as K-7's images are obviously more noisy primitively (actually the Samsung 14.6MP CMOS sensors, no matter the old or the new versions, used in the K20D or the K-7 respectively).
200% DR
I do not recommend to use this as ISO 100, which is the best IQ setting with the minimal noise, will not be available when it is enabled.
Memory
All ticked function settings will be memorised. Unchecked boxes and functions will be reset to factory defaults each time when the camera is turned off and on again.
The “Help” Button
If you change the Custom Image a lot, configure this button to set Custom Image. I choose to programme it to call out the Digital Filter on Playback, which is very convenient, instead of going into the MENU and activate the function.
As a reminder, to make the Digital Filter to be applicable using the Help Button, the latest K-m Firmware Version 1.10 should be Upgraded.
Digital Filters
It is just a fun to use, the obtained results and effects are quite good IMO. Read the official user/operation manual for more details.
The “AF” Button
As a no-brainer, I configured this as the AE Lock button. I just cannot live with a SLR without any AEL Button on it. Other “AF Button” functions to me are useless and meaningless, also.
Now with the AEL Button, I can still unlock the exposure after AF is achieved when required (as I set in that Custom Setting option) or just to lock the exposure as desired before I am doing the AF.
Folder Name
To choose DATE to group photos by shooting dates or to put them all in a single Folder called PENTX. I choose the later as I don't want to group my photos in a too separated way and I think all the photos have the time stamps for the image files and EXIF as well, already.
LCD Brightness
-1 is the most accurate setting for the image brightness, as compared to my SpyderPro calibrated monitors and my professional grade EIZO, which is very accurate in colours and tones (hardware calibrated at the factory).
Pixel Mapping
Never try this function yourself as nothing can be undone. And, I don't think it is appropriate to open up such a function to the users. My opinion is that whenever new dead pixel appears, the user should take the camera for checking and servicing!
Dust Alert
Remember to point the camera for an even scene or object filling the whole frame when doing the check/test. The camera will check for the more obvious dust for you. For those less obvious and minor ones, the camera is actually more tolerated and would ignore them. For best and most accurate result, point to an even blue sky without any details (but just blue colour) on a bright sunny day.
Dust Removal
As usual, this function is just useless. Just forget about it, it won't do the job, nor it is good to the mechanical alignment of the sensor if you do this too much as its “hitting” on the boundaries is just too vigorous.
Sensor Cleaning
To my surprise, I found that the K-m sensor is not as “slippery” as the old sensor used in my K100D. The original Sensor Swap by the Photographic Solution can remove the dust but I found that it leaves some traces which I had never found with my old Pentax DSLR bodies with the old 6M sensors. Well, there is the new E2 cleaning solution instead of the old Eclipse anyway, which is specifically designed for the Sony 10MP CCD sensors used by various DSLRs of different brands. Fortunately, despite that I can see the traces on my sensor under a strong spot light, these cannot be seen so far in any real-life pictures taken with my K-m and I might buy also the official Pentax cleaning kit set O-ICK1 later on when dust appears again and after I have used up all my Sensor Swappers.
My Other Custom Settings
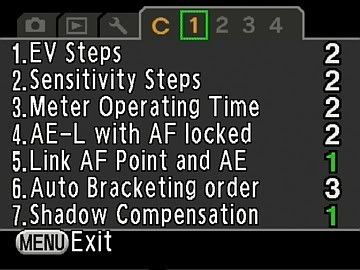
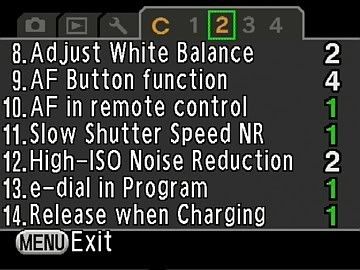
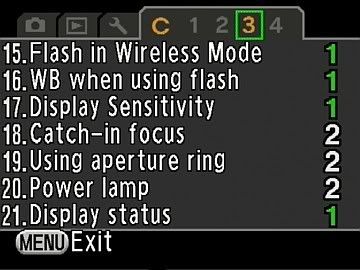
The 3 menu pages of all my Custom Settings are captured as below. And some remarks of mine on the selection are as follows:
| Custom Setting No.: | Remark: |
| 1. EV Steps | 1/3EV is more precise for the control and exposure compensation. |
| 3. Meter Operating Time | I choose 3 second, as short as possible to save battery power. The shutter release button will be half-pressed and held anyway. To view the Status INFO Display, just press and hold down the INFO button for any duration as required. |
| 4. AE-L with AF locked | Enabled.(See my previous technical article about this for more details.) |
| 5. Link AF Point and AE | Disabled. (See my previous technical article about this for more details.) |
| 7. Shadow Compensation | As discussed above, this should be enabled with the enabling of the Weakest Noise Reduction. |
| 9. AF Button function | As a no-brainer, I choose the button as the AE-Lock! |
| 12. High-ISO Noise Reduction | Enabled at the lowest setting for best results, it will apply to all ISO speeds. Whilst its effect can be seen, the image details are well preserved |
| 20. Power Lamp | I don't need a super-bright power lamp LED indicator, so I just turn down its output level a bit |
Setting Summary
Last but not least, here are some quick checkpoints for my optimised settings:-
1. Exposure Compensation of +0.3EV is always applied to avoid underexposed pictures and to suppress noise;
2. Single AF is used, Central AF Point is selected;
3. Use Multi-Segment Metering with AE Locked when AF Locked;
4. Use Natural Custom Image Mode, Saturation -1, Contrast +1, *Fine* Sharpness -1, for most faithful colour and grey reproduction with good Image Quality;
5. Turn on Shadow Compensation for more shadow details and better Dynamic Range (Factory Default anyway);
6. Turn on High ISO Noise Reduction, Weakest Setting (Not Factory Default);
7. Configure the AF Button to be used as the AE Lock;
8. Use Lithium Batteries as far as possible for better camera performance and more reliable camera operation. Just in case you can find an Regulated CR-V3 like mine and you dare to do some hardware hacking (with the basic technical knowledge and skills), try this for my own unique rechargeable solution. Btw, I still found that Eneloops on my K-m is not stable and reliable for most of the time.
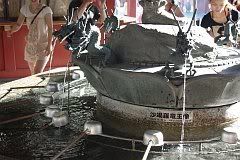
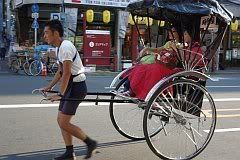
3. Sample Photos (Update 1-23: Full Size Original Images Removed)
Notes:-
(i) Click any of the thumbnail images below to Enlarge.
(ii) All pictures were produced in-camera in the Finest JPEG setting. They are only downsized to 1920 pixels for the longer side and unedited. All EXIF preserved (even for the thumbnails).
(iii) All pictures were taken handheld with the Kit Lens DAL 18-55 with the same universal optimal settings of mine as described in this article.
(iv) Except for the first three night scene shots, the exposure compensation values are either +0.5EV or +0.3EV.
(v) Copyright 2009 RiceHigh! Please feel free to download and view. But any other unauthorised use is not allowed, unless prior permission from me is given. And, you're free to link to my pictures (preferably to my this article) as long as I am acknowledged for the ownership of my pictures.
