Web Analytics RiceHigh's Pentax Blog: Computing Hardware
Showing posts with label Computing Hardware. Show all posts

Thursday, October 09, 2014

Ricoh Announces WG-30W and WG-30 Rugged Compacts


http://www.dpreview.com/articles/9007370912/ricoh-announces-wg-30w-and-wg-30-rugged-compacts

The "W" version has the built-in WiFi, the first "in-house" (non-OEM) Ricoh camera that have it, still good because very late is better than none! :-) NFC is still lacking, though, unfortunately. Moreover, do also note that the WG-30s do not have any GPS receiver built-in, which is really not good for an adventure camera which it is meant to be.

Tuesday, November 05, 2013

That's Called Persistency!


http://www.youtube.com/watch?v=DHOagAADH_M

Wow, what a high performance camera!

Wednesday, October 09, 2013

Official K-3 Promotional Videos at YouTube


Wednesday, February 06, 2013

Full Review: K-5 Wi-Fi, Q Wi-Fi and EOS 5D6! ;-)


(Above: My New 5D6!~)

Background

I bought this and all my current cameras have now suddenly become Wi-Fi capable! :-D


So, my Pentax Q is now the Pentax Q Wi-Fi, my K-5 is now the K-5 Wi-Fi and my 5D3 is the 5D6 now, which is actually a 5D3 with some of the Wi-Fi features of the 6D two in one!~

Basic Operation

This card has two transfer/connection modes, the first is that the card acts as a Wi-Fi Access Point itself, which is called the "Direct Mode" by the maker and the second is that the card logs in a common Access point so that it can communicate with all other mobile devices that are connected to the same LAN under that AP, which is named as the "Internet Mode".

Software

Install the App for the OS of your device, then photos/videos in the card can be browsed, selected and downloaded. Actually there is nothing to set up for the card and device, what you need to set is only the login username and password when the card acts as an AP (for your mobile devices to log in) and also the AP(s) that the card is to be connected, which a maximum of three AP logins can be remembered. For better security, the user may also wish to change the default admin login and password. That's all of it!

For other devices with other OSes other than the above, e.g., a laptop runs on Windows, the SD card still provides a webpage interface to do the jobs for the same function set. The internal IP address for that webpage is http://192.168.11.254/.

Btw, the full user manual and working instructions of the cards (in 16 and 32GB) can be downloaded from the official Transcend website here.

Compatibility

It should be noted that Transcend has maintained an official list of compatible and incompatible cameras with their this model of the Wi-Fi cards, which they have fully tested, I believe. In fact, my card was programmed with the Firmware version 1.4 which I found was really not compatible with my K-5 (even with the latest Pentax firmware 1.14), but it did work well with both my Q and 5D3 instead. So, their compatible and incompatible lists are 100% correct for what I tested!

So, what I did was to update the firmware to 1.5 (which can be found here, together with full update instructions) and after that I was happy to find that it also works in my K-5 now! :-D Btw, I have not tested it with my other cameras (many) but I hoped that it will work eventually!

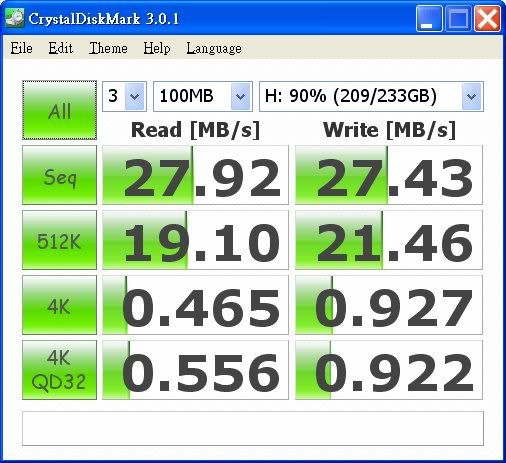
Connection Speed and Stability

Overall speaking, I found that the connection is stable and transfer is fast for the "Direct Mode", while in the "Internet Mode" the performance is not that good and it is rather slow, although the connection did not break anyway, last time I tried. I have tested it with my above three cameras and no problem of any was found. One important tip to keep the Wi-Fi connection alive is by always keeping the camera awake when Wi-Fi is needed. This can be easily achieved by either seting a longer power save activation time or to half-press the camera more frequently from time to time when needed.

Power Consumption

As for the power consumption, as any other WiFi cards and devices, it uses up the battery juice quite a bit and the card will become warm after a certain period of use. I found that for device that has a small capacity battery like the Q should be used more cautiously whilst for devices that have a larger battery like my 5D3 and K-5, it is much a lesser problem.

There is one tip of mine to save power yet, that is, to set the auto power off to one (1) minute for the time-out period after the card is powered on but not connected. And at the same time, the camera's auto power off time limit could be set to longer, e.g., 4 minutes for my 5D3 after idling. So, the WiFi SD card will become a normal SD card without wasting power to transmit RF when it is actually not connected - best of both worlds. :-D

Supported File Types

The card and software should support all common photo and video file types. It fully supports JPEG directly without the need of installing any external App. As for other more special file types like the PEF and DNG etc., I have tested it with my Pentax Q in RAW(DNG) mode and it does fully work also! Just press hold (instead of just click directly the file, which will launch the associated App) or use the selection function (if there are more than one files in folder) and download the selected DNG files under the Transcend App's Browser (under the "Others" File Type Tab) and then you can start working with any installed App that can handle the DNG files after they are downloaded. Ditto for the MOV/AVI video files, which can be downloaded under the "Video" File Type Tab instead.

Trick for Using with the 5D3

Btw, there is a special using tip of mine with the 5D3, I think, i.e., with its dual card slots and flexible saving configuration options, I set to record separately with the CF and SD cards. Whilst for the CF card I set to the best quality JPEG or RAW as needed, I set for the SD card to record a small 2.5MP "S2" JPEG which is far smaller and thus much faster to transfer to my mobile devices. Just see the illustration below:-


Conclusion

All in all, this Transcend card is the best buy I can find now and I am impressed with the support, stable software and continuous improvement of its software (including firmware) as a whole package. It is a Class 10 card in 16GB for mine, and it is much cheaper when compared with other (older) alternatives such as the Eye-fi and the Toshiba FlashAir for the same storage size and speed. Do note that both the Eye-fi or FlashAir does require a first-time setup at the computer instead of capable to do the transfer On The Go with *any* Wi-Fi device like that the Transcend can do, without the need of a setup computer. Nonetheless, there are other options of Wi-Fi SD cards like those made by the Chinese brands of PQI and EZ-Share etc., but I do trust Transcend more for the SD card itself as a storage mean as the brand is more famous and well known.

Tuesday, November 06, 2012

Bits and Pieces Today (11-6)

1. Supports Only Original Pentax Lenses!

I always suggest Pentax users buy only original Pentax lenses. It is because if you want to use Sigma or Tamron or even Tokina, there is no reason to stay with Pentax, as those 3rd party lenses are rather limited in K-mount in both models and availability. So, why to do so, to get the worst of both worlds?!

Now, more and more compatibility issues have been reported with the latest Pentax bodies and/or firmware with those 3rd party lenses, here is a latest user report about (in Traditional Chinese) that the K-01 V1.01 firmware doesn't work well with his Sigma (17-50/2.8 OS HSM).

2. Reliability of the DA Limited Lenses

It is reported by a DA 40 Limited user that (in Simplified Chinese) the aperture blade of his new lens that has only been used for two months have had its whole mechanism self-disintegrated without any good reason one-day suddenly!


3. The Relation of Rolling Shutter and SR for Video Recording with the K-01

See what this Pentax user reports at the DPR. If it is really true, it is possibly that the processing power of the Prime M processor is insufficient to do both things well at the same time!

4. I am a Pentaxian!


Via DC Home Pentax Forum (in Traditional Chinese)

Wow! I have nothing more to say!! :-o

Friday, October 26, 2012

Focus Peaking Trick on E-M5 (Which has NOT the Feature! Trick NOT works for Pentax Bodies!)


http://www.youtube.com/watch?v=UpOqo6gA92Y

Via 43 Rumors.

Wow, this OM-D user is really clever and brilliant!

However, this tricks does NOT with any existing Pentax bodies which do not have the focus peaking feature built-in, i.e., those models without a PRIME M processor, including the K-5, K-5II/IIs and the Q. It is because the in-camera digital filters of the Pentax cameras are applied in post-editing, but not viewable at real-time in Live View.

Remark: To those particular fanboys: Whoever wants to argue again, do read the relevant Pentax user manuals and try before hand. If they don't have those Pentax cameras (which they usually don't have the gear they defend!), I would ask them to get the soft manuals online first! :-o

Thursday, October 25, 2012

More K-5 Vs K-5II Comparisons (Moon Shots and Outdoor LCD Views)


(Left: K-5; Right: K-5IIs, 100% Crops.)

Via Post @ the Chinese Xitek Forum

Well, the poster commented that the difference in sharpness is negligible in his opinion. Besides, I found that the colour rendition of the K-5 is better, once again! The K-5IIs shot is somehow greyish for the blue.


(Left: "Air-gapless" LCD Mon. of K-5II; Right: K-5.)

Via Post @ the Chinese Xitek Forum

I like the colour rendition of the old K-5's LCD monitor better. It looks more faithful and detailed than the new air-gapless LCD. In particular, just view the heavy blue cast of the white sky of the air-gapless mon. and that the green colours do look odd and unnatural. But yet, the outdoor visibility in the field is not differed by that much against what is officially claimed!

After all, it is really not good to run bare, for both the sensor and the LCD! :-o ;-p

Wednesday, September 26, 2012

New D600 DxOMark has been Out


DxO says that it sets the high bar for image sensor quality. Let's see how it is compared against the current line of the Pentax DSLRs! Don't see a K-5II and IIs? I'm afraid Pentax has not yet given a test sample to them earlier. And even though they have already done that, *miracle* for big advancement in the results is NOT expected, by considering that the II and the original I are with the same sensor and even same old image processor!

Friday, August 24, 2012

Fujitsu Milbeaut Image Processor MB91696AM

It is generally believed that this is the native Prime M processor which is originally designed and manufactured by Fujitsu for Pentax:-

http://jp.fujitsu.com/group/fsl/en/release/20110208.html

The MB91696 has a dual-ARM core and has built-in H.264 codec that supports Full HD video. In fact, it has an all-round/all-in-one system architecture for what a modern digital camera needs:-


(Credit: Fujitsu Semiconductor Pacific Asia)


Note that it has all the I/O interfaces and drivers/controllers for all the standard peripherals as shown in the above.

Besides, it has a maximum image processing frequency at 216MHz according to this published summary datasheet which means a maximum of 8 fps at 14MP or 5.5 fps at 20MP as told in the marketing information (which should be 7.7 and 5.4 fps respectively, to be exact).

So, let me further calculate the maximum frame rates for a 16MP or a 24MP sensor then, which is equal to 6.75 frames per second and 4.5 fps respectively, at most. The 6.75 fps figure tallies well with the 7 fps continuous shooting rate of the K-5 actually.

And, shall we see a Prime M II or a Prime III processor in the near future then? Possibly not I suppose, just see the roadmap as published by Fujitsu for the last time:-


(Credit: Fujitsu Semiconductor Pacific Asia)

It it noted that the 7th generation of the Milbeaut image processor has not yet been out and it is not found at any of the official Fujitsu pages.

Anyway, we shall see the new K-5 very soon, just wait for the first week of September, something may come.


Read Also:-

The Secrets of the K10D (Part 3 of 3) – The Brain: The IPU

The Maker of the "ADC" and "IPU" Chips used in K10D

Friday, April 13, 2012

Inside the K-01


http://dc.watch.impress.co.jp/docs/news/interview/20120326_519765.html
(An interview in Japanese)

It seems that there are still quite some spare spaces inside the body and further minimization should be possible. Besides, the inside of the K-r is also compared. Finally, it can be seen that the Static RAM chip used is from Hynix, a South Korea semiconductor company, but not from Samsung, which is also a major memory manufacturer.

Update (4-21): Here is yet another K-01 disassembly by someone. It seems that the K-01 is just easy enough to disassemble:-


(Click to Enlarge and Pop in New Tab/Window)


View Also:-

Disassemble a K-5

Tuesday, February 21, 2012

SD Card Speed Shootout Test on K-5 (Sandisk Extreme Vs Ultra Vs Standard Vs Transcend Vs Kingston Vs Toshiba & Vs GF1)

The measur(e)bator strikes again! :-D


Test Conditions and Procedures:-

1. Latest version (3.0.1) of the Crystal Disk Mark was used, which the standalone executable version in zip format can be got there;

2. Each card was freshly formatted in-camera right before carrying out each test;

3. Connected the K-5 via original dedicated USB cable, battery indication of camera was Full;

4. PC Platform: Intel E8300 Core2Duo at 2.83GHz, Windows XP Professional SP3;

5. Tested for 3 times and the best results were obtained, total data transfer size was 100MB;

Test Results:-

Card (Make/Model/Class)
Sequential Read** (MB/s)
Sequential Write* (MB/s)Random
512k Read (MB/s)
Random 512k Write (MB/s)
Random 4k Read (MB/s)Random 4k Write (MB/s)Screen Capture of Test Results
Sandisk Extreme 16GB HD Class 10/I
11.66
8.940
11.67
2.841
2.711
0.828
View
Sandisk Ultra 16GB Class 4
12.13
5.924
12.08
1.163
2.883
1.417
View
Sandisk Standard 8GB Class 4
7.776
4.283
7.770
1.262
2.378
0.905
View
Transcend 8GB Class 6
12.57
7.075
12.58
2.133
3.870
0.029
View
Kingston 8GB Class 4
9.881
5.828
9.821
0.671
2.485
0.006(!)
View
Toshiba 2GB Class 6
12.03
9.029
12.04
6.242
3.199
0.153
View
Toshiba 2GB Class 6 (on GF1***)
8.237
6.456
8.271
4.830
1.344
0.136
View
Kingston 1GB Class-less (Reference Baseline)
6.5272.531
6.526
1.456
2.656
0.026
View

Remarks:-

* Sequential Write is the most important performance figure as most digital image and video files are usually written sequentially.

** Sequential Read affects playback time for review and determine the time for copying/moving back the image/video files from memory card to computer.

*** GF1 is also tested with the Toshiba 2GB "White Card" as it seems to perform very well in K-5 despite its age. The performance difference between the two cameras is then checked and compared. It seems that the K-5 is roughly about 50% faster than the GF1 for both reading and writing.


Update (2-23): Some people have questioned about the speed of USB of being the "limiting" factor in my test. But as I've already replied in the Comments section below, USB 2.0, which the K-5 uses, had a maximum transfer rate of 480 Mbps (Mega bits per second) in its designed specifications which is close to 60MB/s (Mega Bytes per second) roughly (assuming 1M = 1,000,000 bits and the simple fact that 1 Byte = 8 bits).

To further prove that the USB is not the bottle neck but the camera plus the card should be, the following simple test has been done for verification. I've connected an external hardisk drive with an USB 2.0 interface, via a cheap SATA-to-USB2.0 adapting case. Here is the result of the harddisk under test, which is just a typically slow 5400 rpm "250GB" one:-


All in all, the above quick test and result actually safely disproves all the unsubstantiated claims of suspecting that the USB is "not fast enough". Even if a slow harddisk with a cheap external casing can do nearly 30MB/s for both the sequential read and write! I am almost sure that if I use a better adapting case with a faster harddisk and re-do the same test again with the disk freshly formatted, the throughput rate can be even higher (and note that my that harddisk under test above is nearly full at 90% spaced used). So, the *bottle neck* must NOT the USB, but the camera+card as a whole instead!

Nevertheless, I do yet agree that the USB does incur some additional overhead in operation and thus would induce some performance loss than the real speed of the cards which could be higher, when they are read and written direclty in-camera. However, the difference should NOT be highly significant against what have been imagined and that it should be noted that it is an apple-to-apple fair comparison of this test. Furthermore, I just wish to ask what other method(s) else could do the measurement more accurately and realistically? (Not even to say to do it easily!) :-o

Friday, December 02, 2011

Calibrating (Colour Correcting) Your Monitor Using This Blog Page

About three years ago, I updated the colour scheme of my Blog. The look of the "new" colour scheme is not only about aesthetics, but there is a little secret that I have not told before.

That is, my Blog page could be used as a simple quick test target for colour calibration of your monitor! :-D

Now just note that the main text background of my Blog is in pure yellow in lighter/brighter tone. As such, it represents specific highlight colour accuracy in that colour. Pure yellow colour contains only Red and Green. So, you shouldn't see any colour cast except yellow if your monitor is colour corrected and the yellow should look as pure as possible.

Next, the Blog heading/title bar/area in in deep grey and the above principle also holds. Deep grey is one of the shallow representations. It should display equal Red, Green and Blue if the display device is colour corrected. If you have seen any colour cast in the title page, it simply means that there is colour errors with shallows of your display device!

As for the other minority colours of my Blog page in smaller areas, the remaining are light grey and white. Again, they should contain "no" colour~

Nowadays, most people use LCD monitors. And for most LCD monitors, there are settings for controlling the overall (backlight) brightness and the individual brightness (gain) of the R, G and B primitive colour channels. So, try to adjust all these four to get the best colours of my page, then you're almost close to a more colour-correct(ed) display for viewing images than what your monitor originally could do for you!

If your monitor also has the contrast (i.e., the back level) adjustment also, try to adjust the most suitable contrast and brightness first with a grey scale chart like that displayed in every DPR camera review. Then adjust the RGB gains and colours.

If you see that the (high)light colours of my Blog page contains more cast than the subject title area (for deeper tones/shadows) or vice versa, that means that the colour display errors of your monitor is not linear against the brightness (from dark/shallow to bright/highlight). So, you have to make the compromise and find the balance point. At the end of the day, there is not much to do unless you use an external hardware monitor colour calibration device to do the adjustment further.

After all the pure text talks above, let's look at the following screen capture of the "LUT" (stands for Look Up Table, download a LUT management utility here) colour correction curves of an eye-adjusted EIZO monitor of mine using my Blog page as target below:-


With the best factory colour profile without any "human" colour correction, the Spyder measured LUT table actually looks like this:-


Note about Green and Red are suppressed so as to compensate for the yellow cast which is caused by the aging of my that monitor, which has been used for prolonged time of more than 3 thousand hours over years, particularly, the "white" fluorescent backlight source could become more yellowish.

So, it leads to an important tip for hardware calibrating monitors, i.e., one should *always* try to adjust the monitor to a better display status as far as possible by *own eyes* before hardware calibrating the display. The above example shows that the final display accuracy of the former hardware calibrated monitor is yet better than the latter. The difference is indeed quite obvious. It is because the lesser the original errors for correction, the better the final results will be - simple logic? :-)

Last but not least, you can see that the "better" RGB correction curves coincide with each others very well, that means that my eyes had actually been really accurate and the Spyder actually supports my judgement! ;-D However, do note that the gamma and contrast have still been adjusted and compensated by the Spyder somehow, as it can only be measured and corrected via the ICC/ICM profiles (i.e., the LUT table) by using the Spyder (or any other hardware monitor calibration device).


Read Also:-

My Spyder2(Pro) Retired..

Blueish "LED" Screens? (How To Make Them Colour "Correct"!)

Testing the Colour Accuracy of Your Display and Eyes!

Thursday, December 01, 2011

Software "Deblur"/Shake Reduce an Blurred Image via Post Processing


http://www.cse.cuhk.edu.hk/~leojia/projects/robust_deblur/deblurring.htm

Before:

After:-


I haven't tried the software myself and thus have no comment on the performance. Do note also that this software is of a trial version which supports photos up to 800 x 800 in pixels, which would be just fine for web displayed ones.

Lastly, do note that the software supports specific NVIDIA GPU-equipped display cards and the GPU will be utilised to accelerate processing speed if it is compatible. Seems nice~

Wednesday, November 09, 2011

Cable Control Your (Pentax) DSLRs Using iPhone


(Credit: DC Fever)

Using the ioShutter.

Now, if your Pentax DSLR has a cable release socket, then you can use your iPhone to fire the shutter remotely but wired, and with even more software control capabilities including interval shooting, programmable bulb and sound/movement trigger etc. A nice and welcome Pentax alternative of course. And with many people are having iPhones nowadays, it could come in handy, provided that the user also brings along with the proprietary interfacing release cable that is to be purchased from the ioShutter altogether with the App.


Related:-

Remote Control Your Camera Using Android Device

The Pentax (Electronic) Cable Switches

Thursday, July 21, 2011

Market Leaders of Digital Imaging/Electronic Gadgets for the First Half of 2011 in Japan

See the BCN report below, the sales results are for the first half of the calendar year 2011, in Japan:-

http://www.bcn.co.jp/press/press.html?no=260
(in Japanese, via latest news article and brief summary at DC Watch today)

Full English translation of the report in pdf via Google can be read here.

So, here is what I've copied and pasted the English-translated full table of the Japanese No.1 market leaders of those:-


So, Canon takes almost all the crowns for traditional digital camera stuff including P&S DCs and DSLRs and Lenses, whilst Olympus is the market leader for the mirrorless (ILDCs). Sony is there for several things, but they are not solely camera related, i.e., these are either audio or video/visual related things. Besides, Sandisk is still the king of memory cards used for the digital cameras.

Monday, April 04, 2011

New Blogger Viewing Interfaces/Themes

I don't know if these will be more reader-friendly for portable devices. And I don't know if you would like them more than the traditional one. Just try them out yourselves to see if you like any of them or would they be more readable:-

Flipcard - RiceHigh's Pentax Blog

Mosaic- RiceHigh's Pentax Blog

Sidebar - RiceHigh's Pentax Blog

Snapshot - RiceHigh's Pentax Blog

Timeslide - RiceHigh's Pentax Blog

Anyway, if I have to choose one out of these, I prefer the "Sidebar", which is neat and tidy and easy to read IMO. (whilst some other basic information of my Blog are omitted, though. :-()

Out of curiosity, I am also making this Poll. Vote Now! ~

Which Blogger Interface Would You Prefer?
Traditional
Flipcard
Mosaic
Sidebar
Snapshot
Timeslide
pollcode.com free polls

Sunday, December 26, 2010

My Spyder2(Pro) Retired..

My Spyder2Pro has served me well for years. But since there has been the 3 out there for quite a while, I have been tempted to upgrade for long. :-)

But as I found that I always use 6500K and Gamma 2.2 for my calibration and I do not use dual monitor configuration but just a single monitor, I opt to buy the new Spyder3Express, which is essentially a "downgrade" if only the product class is concerned! :-0

Indeed, the Spyder3 Pro version has many more additional features than the Express, which is just an entry-level product afterall. In particular the "Native" colour temperature option and the ambient light (and colour) sensor is what that I don't need (as it varies differently anyway throughout the day as I always work near the windows, at home or at work). The re-calibration "assistant" to me is a real annoyance, and I have disabled that for my Spyder2Pro using some method that I briefed before in my previous article.

I bought the Spyder3 in late November but I have only unpacked it and tried it during the X'mas holidays. I have calibrated two monitors of mine so far, a Dell 24" Full HD 16:9 UltraSharp and an older EIZO 4:3 19" LCD. Below are some screen shots during the calibration process:-


[ Just forget about the serious pin-cushion distortion of the shots, it is just one of the "characteristics" of the Sony NEX 18-55 kit lens! :-( ]

Well, what I can tell is that the 3 works quite obviously better than the 2 with LCD. I've got better colour/tone accuracy and better consistency across different machines as well. Anyway, it is just not something totally surprised for what the latest electronic device/gadget with the latest technologies does shine over the old ones. At only (US)$90, I think this is just a real bargain, and most importantly, it does really work, and very well! :-)

For more about how to work with the Spyder 3, read this tutorial (unofficial).


Read Also:-

Blueish "LED" Screens? (How To Make Them Colour "Correct"!)

P.S. Later on, I might re-calibrate my LED notebooks and upload my Spyder3 ICC profile for these blueish monitors!

Wednesday, November 10, 2010

High K-5 DR of the DxOMark: (Hardware) Mathematical Trick of the New Sony Sensor?

See what our knowledgeable Russian Engineer and Pentaxian Oleg V analysed and explained:-

http://forums.dpreview.com/forums/readflat.asp?forum=1036&thread=36859818

Oh well, whilst I don't find any flaw with Oleg's arguments, I think a real-world DR test is still required to find out the truth. So, let's wait for DPR's result, as I believe their DR test is closer to real-life and should be more meaningful.

Or, if you are just a K-5 user, you can follow the methodology and test adopted by that D5000 user as quoted by Oleg V, and the *usable* DR of the sensor/DSLR can still be found out briefly. Btw, I still prefer DPR's methodology of shooting a lightness "stair" simultaneously (and of course) as this is just what we want for the widest possible DR practically in daily shooting.

But if the DR of the new Sony sensor (of the K-5/D7000) is just measured to be lower later on, then it is just sad that now even sensor maker also does trick(s) to optimise their hardware for *benchmark*, which is just nothing about real performance, subsequent to what display card chipset/GPU makers have been doing this for years already, say, for the 3DMark.

Thursday, October 07, 2010

Testing the Colour Accuracy of Your Display and Eyes!

Here is the Challenge! Dare to Try? ;-)

http://www.xrite.com/custom_page.aspx?PageID=77

With an accurate monitor and display plus good eyes of yours, you should get the lowest possible score! Hope you could get a Zero mark then~

Btw, you're welcome to report back your score, by putting a comment to this post.


Read Also:-

The Black Book Game (Online)