Thank you for your continuous support and happy reading and viewing! :-D
Showing posts with label My Photos. Show all posts
Showing posts with label My Photos. Show all posts
Monday, August 24, 2020
Notice: Copy and Paste of Text and and Saving of Pictures within Blog are Disabled
In order to avoid possible copyrights infringement, which I could see from my Blog log from time to time, the copy and paste of text and saving of pictures and images within my Blog are disabled, with immediate effect.
Friday, September 18, 2015


Monday, October 21, 2013
Let's Not Forget the Prominent History of Asahi Pentax (Re: Pentax 67 and 645)
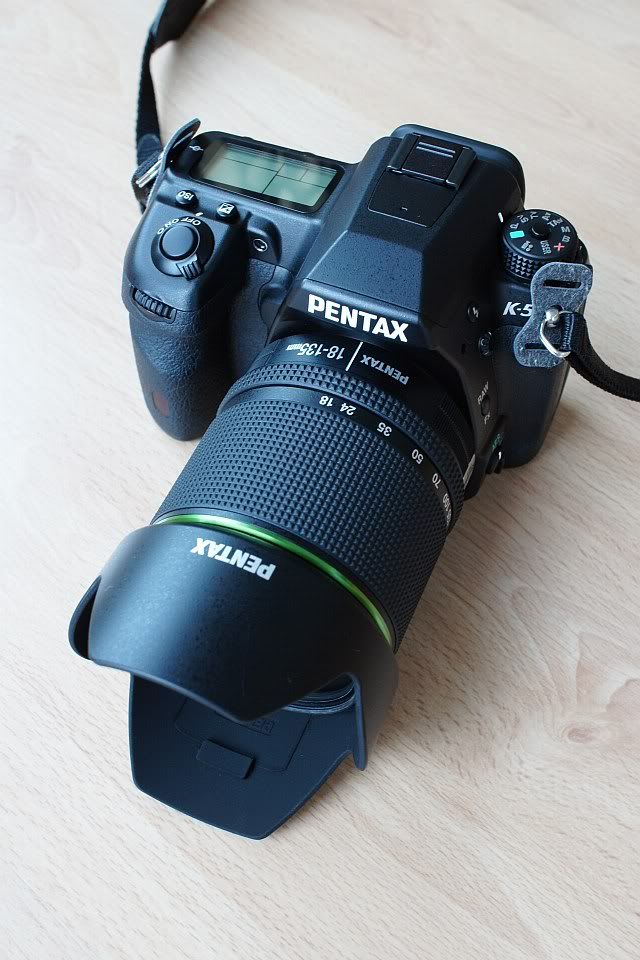
While Ricoh continues to ricohize the Pentax camera and lenses (recent examples here, here and here) and dwarf the name of "Pentax" (instead of strengthening it further!), I am glad to see someone still remember Pentax the brand and is yet making a product with the old genuine brand name of Asahi "Pentax" and here it is!
http://www.dodgeandburn.com/collections/shop/products/six-by-seven
I have got one and found that the textile quality is good and it looks cool. Below are two snapshots with my 645N SLR camera (taken with my *Pentax* K-5 + DA35):


Btw, the original Pentax 6x7, together with the original Pentax 645, are recognised as one of the milestone cameras of Pentax by AOHC whilst my 645N is recognised as a masterpiece. So, why not a 645 T-shirt also? Besides, I would want more colours of the T-shirt instead of only that light cyan colour for the background to "select" from, nonetheless.
Related:
True Fanboyism!
20 Millions of Pentax Cameras in 2013
The 645D Kit (Lens) Got Delivered to an End-User, Finally!
Tuesday, August 27, 2013
Shooting Moon with the Pentax Q and a F*300/4.5 K-mount Lens
Here is the result (from direct JPEG out of the Q, no major re-touching but just only resizing along with light sharpening):
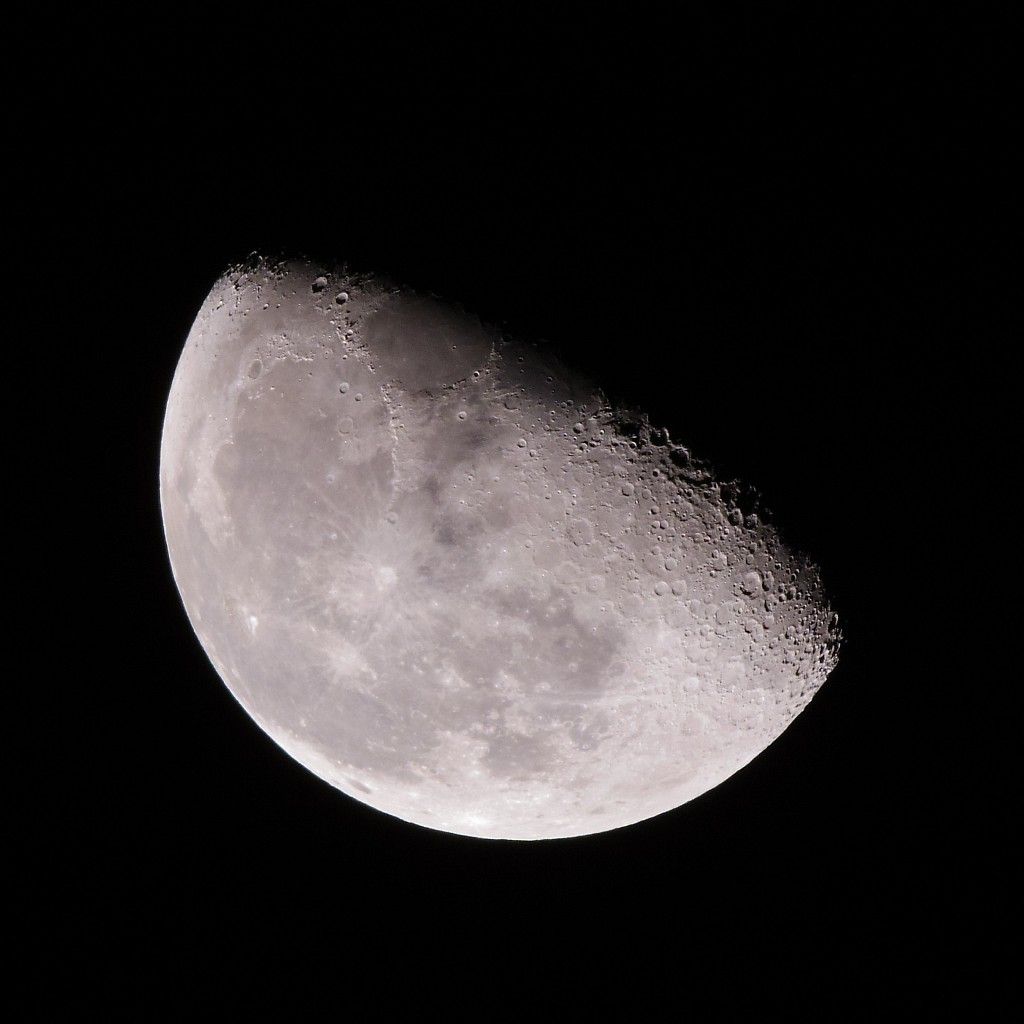
( Click to Enlarge - All Rights Reserved: RiceHigh (c)2013 )
And the combo of my gear that used:
Indeed, there are quite some advantages of using the Q in shooting this type of photos, namely:
1. No mirror slap and even no shutter shock of any during the course of shooting, as electronic shutter is solely used;
2. Large magnification with higher pixel count and not much cropping is needed. The above is with effective focal length of 1680mm in 135, i.e., 300mm x 5.6;
3. Live View mode with focus peaking is especially useful for critical focusing with highest focusing accuracy that is required.
And, some techniques of mine:
1. Use spot metering and M mode, trying to expose to the Right as far as possible but avoid any highlight clipping. (As for the White Balance, AWB is just fine and will do the job);
2. Use IR remote controller to trigger the shutter (no Q camera supports the cable release) and take the shot to avoid any vibration at that very high magnification. Actually, some oscillations could be seen if the shutter release button is pressed directly;
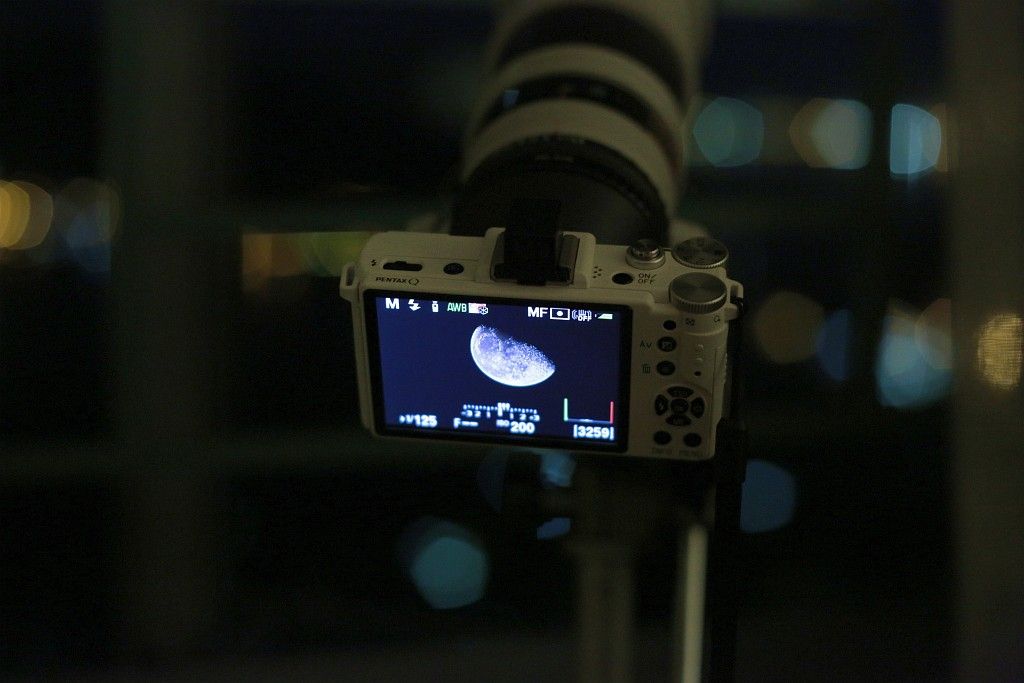
3. Use MF focus peaking in 2X or 4X to achieve even more accurate focusing. Choose the right magnification can help even better centering of the moon. In my case, I chose 2X, as shown below:
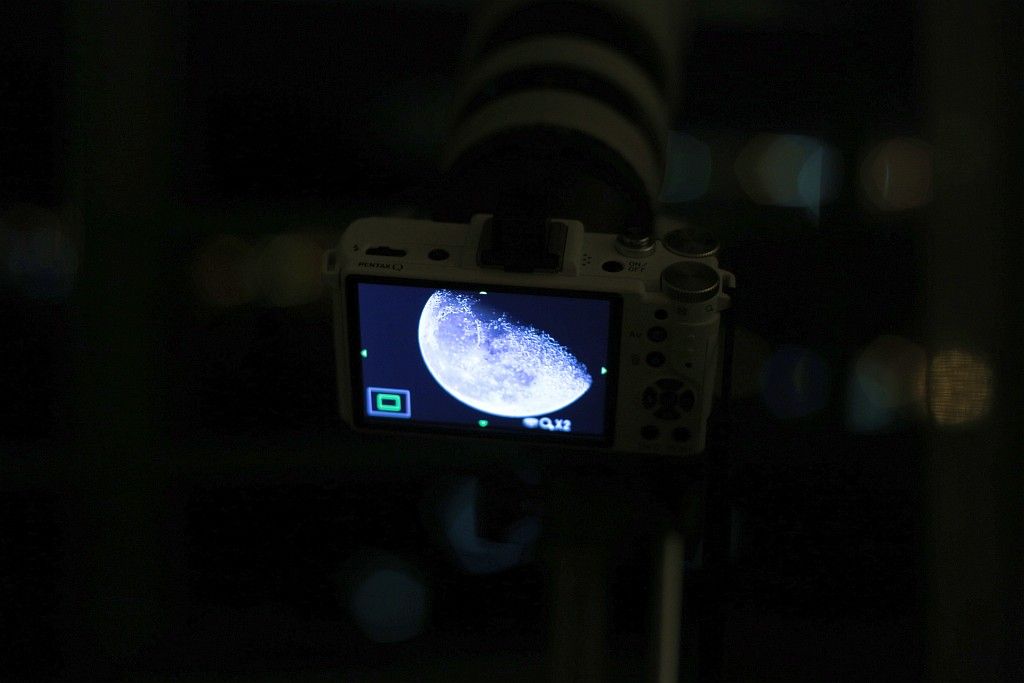
4. Do not use very high ISO of the Q as details will lose significantly and dynamic range will be more limited. I chose ISO 250 for the best compromise of a higher shutter speed but not too high an ISO speed;
5. Stop down the lens for sharper result. The above exposure combination is f/8 and 1/125s at ISO 250, i.e, one stop faster than base ISO.
Last but not least, a very high quality K-mount prime lens like my F*300/4.5 is required. Otherwise, all those optical imperfection will appear (as they are greatly magnified with the 5.6X crop factor) before anything is recorded! :-o
Related:
The Unbalanced Q - Part 2.5: Photo Samples
The Unbalanced Q - Part 2 (with a K-mount Lens)
Total Lunar Eclipse (2011-12-10, at Hong Kong)

( Click to Enlarge - All Rights Reserved: RiceHigh (c)2013 )
And the combo of my gear that used:
Indeed, there are quite some advantages of using the Q in shooting this type of photos, namely:
1. No mirror slap and even no shutter shock of any during the course of shooting, as electronic shutter is solely used;
2. Large magnification with higher pixel count and not much cropping is needed. The above is with effective focal length of 1680mm in 135, i.e., 300mm x 5.6;
3. Live View mode with focus peaking is especially useful for critical focusing with highest focusing accuracy that is required.
And, some techniques of mine:
1. Use spot metering and M mode, trying to expose to the Right as far as possible but avoid any highlight clipping. (As for the White Balance, AWB is just fine and will do the job);
2. Use IR remote controller to trigger the shutter (no Q camera supports the cable release) and take the shot to avoid any vibration at that very high magnification. Actually, some oscillations could be seen if the shutter release button is pressed directly;
3. Use MF focus peaking in 2X or 4X to achieve even more accurate focusing. Choose the right magnification can help even better centering of the moon. In my case, I chose 2X, as shown below:
4. Do not use very high ISO of the Q as details will lose significantly and dynamic range will be more limited. I chose ISO 250 for the best compromise of a higher shutter speed but not too high an ISO speed;
5. Stop down the lens for sharper result. The above exposure combination is f/8 and 1/125s at ISO 250, i.e, one stop faster than base ISO.
Last but not least, a very high quality K-mount prime lens like my F*300/4.5 is required. Otherwise, all those optical imperfection will appear (as they are greatly magnified with the 5.6X crop factor) before anything is recorded! :-o
Related:
The Unbalanced Q - Part 2.5: Photo Samples
The Unbalanced Q - Part 2 (with a K-mount Lens)
Total Lunar Eclipse (2011-12-10, at Hong Kong)
Tuesday, July 16, 2013
My Samples: FA645 120mm F4 Macro on 5D3
For what last time I mentioned about and intended to do, the following samples were taken and are now posted. Just browse the album below, full-size original samples are available per picture page:
http://smg.photobucket.com/user/RiceHigh/library/5Ds/FA645_120F4Macro?sort=9&page=1
(Or, you can view a quick Slideshow Here.)
All pictures were taken with direct JPEG out of the camera in best quality, hand-held, manual focused, aperture values were set in between f/5.6 to f/8, most at ISO 100.
Actually, I am satisfied with the Image Quality produced by the combo including the Colour Rendition. If you want to compare those pictures of mine against what you can get with the same model of lens on a 1.3X 645D (Mine is in 1.6X, when compared to the 6 x 4.5cm format), you can see the following earlier reviews by the others:
1. A User Review with Full Samples at the Japanese DC Watch. Some of the shooting subjects are quite similar to those of mine:
http://dc.watch.impress.co.jp/docs/review/labo/20110606_450161.html
(in Japanese, but viewing the pictures with foot notes are all self-explanatory.)
2. A Brick Wall Measurbation Test with the lens on 645D, at f/4 wide-opened, f/8, f/11 and f/32. The centre crops are posted:
http://dbphoto.net/blog/?p=124
Enjoy! :-)
Saturday, June 01, 2013
Copy 120 Films Using an ILDC/DSLR with a Macro Lens
First inspired by Petapixel, this is what I have tried and done myself:-
1. These are the tools that I've used: A white fluorescent desklamp at 6000K, two 77mm UV multi-coated filters, a lens hood with outer diameter in 77mm, some "white" milky transparent paper:-

2. Turn on the lamp, mine is a Panasonic with invertor circuitry which enables the lamp operated at a high frequency:-

3. Put on the "diffuser", I have made three folds of the same plastic sheet:-

* Do the custom white balance at this point with your camera. Mine was measured to be at 4600K exactly, after adding the diffuser, which is yet somehow yellowish.
4. The 120 film is then put inside the two filters, which are in the same size of 77mm. The film fits just well with that filter size. The two filters are screwed tight and the film is sandwished inside (although it is not completely flat, though, but the final DoF should be enough to cover this unevenness):-


5. Align at the position and then put on the lens hood with proper length, so as to match the magnification of the whole film frame to fit in the digital image frame and size of the camera:-


6. Find a wide angle macro lens. I am using the Sony E30/3.5 Macro on a NEX. Experiment with the subject to camera distance. I found and added another lens hood so as to make it just right for the image magnification:-

7. Take the photo with steady hands. It is preferable that everything can be screwed together although my above setup doesn't. Adhesive tape may help but I did the following unfixed. Here is the raw result:-

(Above: Pentax 645N with FA645 45mm/2.8, Fuji Provia 100F. For original picture with full EXIF, click and download here. Warning: Large File!)
8. Crop the photo and here is a clean and "complete" scan of the film:-

(For original picture with full EXIF, click and download here. Warning: Large File!)
9. If you want to compare the result for a scan from a lab machine, here is what I got from the lab which scanned my film after the film development:-

(For original photo with full EXIF, click and download here. Warning: Very Large File!)
10. The above lab scan is in 17MPs originally and mine is less than 14MPs for what my NEX could deliver (as after cropping it is less). You may note some vignetting is introduced in my "scan" as my NEX is an old model which could not correct lens vignetting in-camera. But the advantage of scanning the film by oneself is that more things can be adjusted/controlled including the White Balance, Contrast and Colour Profile and etc., which is important IMO. Also, to get the best results, a higher pixel count camera with better image quality should be used and do shoot in RAW mode, which will give you the flexibility of further post-processing for higher image quality and better results.
Sunday, February 03, 2013
AF Performance and Accuracy Verified for the New K-5 Firmware! ;-D
At the Field! :-D (@ the Hong Kong Wetland Park.)


All the photos were taken with my K-5 with my F*300/4.5 lens mounted. The firmware programmed in body is the latest version of 1.14. Phase-matching AF was used mostly for nearly all the shots I took:-

What I subjectively felt was that the AF is somehow faster but I did not find any significant improvement in accuracy, which is yet considered to be fair to good. As for the metering accuracy, it seems that it is somehow improved.
Besides, I would like to add two images that were taken by my Pentax Q at the same place and same time. It is very convenient for not having to change lenses during shooting and especially when I was working with a bigger camera with a bigger lens. :-D It is quite ideal to have the small Q to shoot in conjunction for other things that do not require a long lens but a normal one.


Btw, who said the IQ of the Q is not good enough? The above are direct JPEGs from the camera but only just downsized and then lightly re-sharpened but no other re-touching of any! :-o
All Photos Above: Copyright RiceHigh (c) 2013. No copying nor re-using in any form anywhere is allowed unless my prior written permission is obtained. All Rights Reserved!


All the photos were taken with my K-5 with my F*300/4.5 lens mounted. The firmware programmed in body is the latest version of 1.14. Phase-matching AF was used mostly for nearly all the shots I took:-

What I subjectively felt was that the AF is somehow faster but I did not find any significant improvement in accuracy, which is yet considered to be fair to good. As for the metering accuracy, it seems that it is somehow improved.
Besides, I would like to add two images that were taken by my Pentax Q at the same place and same time. It is very convenient for not having to change lenses during shooting and especially when I was working with a bigger camera with a bigger lens. :-D It is quite ideal to have the small Q to shoot in conjunction for other things that do not require a long lens but a normal one.

Btw, who said the IQ of the Q is not good enough? The above are direct JPEGs from the camera but only just downsized and then lightly re-sharpened but no other re-touching of any! :-o
All Photos Above: Copyright RiceHigh (c) 2013. No copying nor re-using in any form anywhere is allowed unless my prior written permission is obtained. All Rights Reserved!
Sunday, January 06, 2013
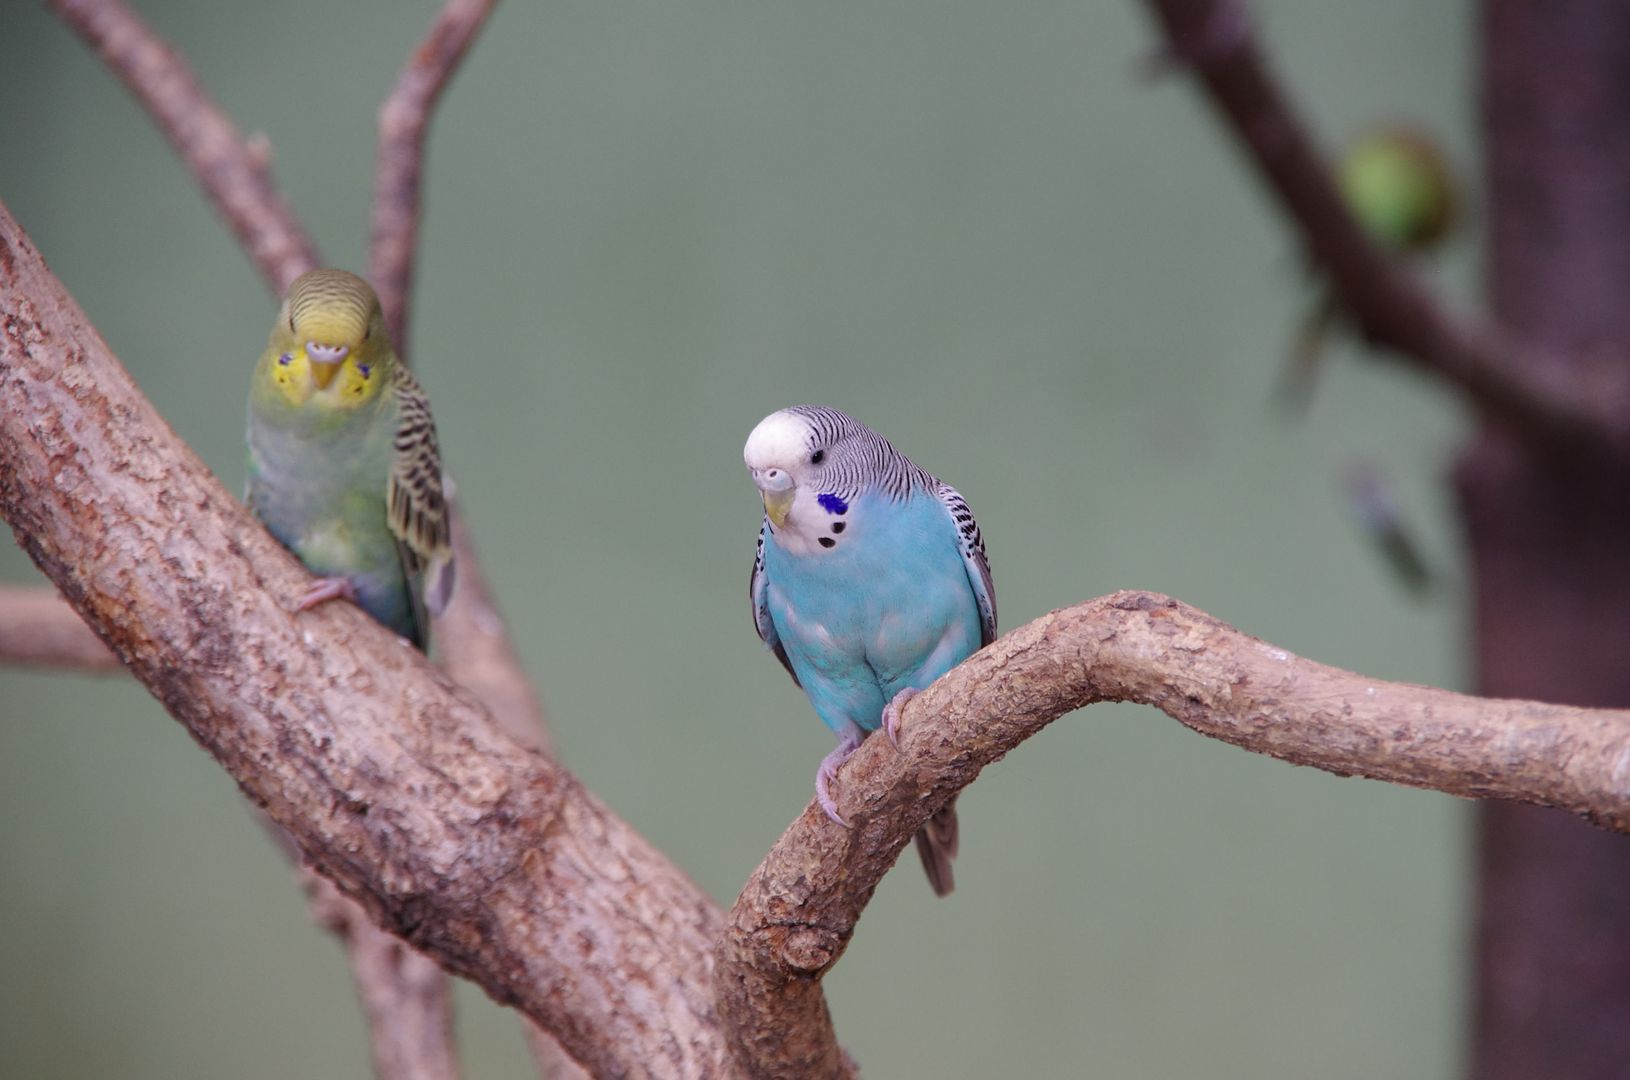
The Unbalanced Q - Part 2.5: Photo Samples
Here are some quick samples taken by the "560mm" lens Q-K combo that I posted for the last time:-


All the above photos were taken handheld, at ISO 320, lens set at f/4 using the aperture ring, which my DFA lens has one but not the latest version, with the in-body SR on (correct focal length input as 100mm at startup). I have done some minor retouch to the above photos, including light up the pictures a bit and to apply some sharpening.
This bird is a small one, more or less in the size of palm, which is very sensitive to human. So, this super-tele combo is a suitable gear to do the job. I don't know its name though. So, if you know, please tell me.
However, there are yet other ways of doing the same job, below is what I have got from my 5D3 body in 22MPs with just a 85mm portrait lens mounted on it, and then did some cropping (there is some room to do it, with the higher pixel count) and resizing/re-sharpening:-


(Copyright (c)2013 RiceHigh)
Okay, I think the IQ of the 5D3 pictures are yet far better. There are quite some obvious purple fringing on the Q pictures, in addition to the low image fidelity of them. I don't like the colour rendition and tone of neither cameras, nonetheless, the Q tone is too cool whilst the 5D3's too yellowish, under the bright sun.
Still, the Q is really funny to use. And how can I carry such a lightweight "560mm" lens and body so easily without such a small form factor of the sensor?! ;-D
Tuesday, October 23, 2012
K-5 is Sharp Enough! (Portraitures w/ DA70 Limited)
Portrait Gallery! (Include Guys and Gals, Slide-show)
100% Crops (No Sharpening, Slide-show)
The K-5 plus Pentax glass is really sharp enough! Besides, we can see nice Pentax colours and skin tone! ;-p So, what's the point of a "new" K-5II which has reset the price to 50% dearer?! :-o
View Also:-
Some Recent Random Snapshots of Mine
Who Said K-5 Cannot be Used as a JPEG Camera?
Monday, August 06, 2012
My Practical Review on the DA18-135
As we all know, this lens received rather poor rating and adverse comments at the PhotoZone and then the official early samples posted by Ned Bunnell did look bad either.
But then stupid fanboys of Pentax like me are actually irrational ;->, I went bought this lens regardless of the poor reputation of this lens all over the Internet! :-o
This time, I am going to write a practical review on the lens, with more real-life photos of mine shown, for what this lens can deliver, on a K-5. You will see how "poor" this lens could be!~
First of all, still some comments of mine in words. As you can see from the above modelling photo, this lens is really compact and lightweight. It has an internal focusing mechanism such that the length of the lens will not change during focusing. And of course, the front element will not rotate.
I am much impressed with the build quality of this lens, which is the best amongst all DA Pentax standard zoom lenses that I have ever used, I would say. Even the bundled lens hood is better built than most of other Pentax', with matted lining inside and the rugged texture outside which contributes to a solid feeling. At the beginning, maybe owing to the weather sealing, when the lens was first opened brand new out of the box, it is very tight to zoom. But then after the first few days of use, the friction and resistance became just right provided that it is not zoomed too fast and too quickly otherwise higher resistance can still be found.
Speaking of the DC motor and its AF performance on K-5, it is fast, moderately accurate and silent although it is not completely silent and some very small sound can still be heard in really silent environments (ditto for the new Canon STM, which I also have). Under the Live View mode and with this DC lens, the LV CDAF is obviously faster than with other conventional type Pentax AF lenses.
Now, let's come to the IQ part, this lens is quite sharp in the image centre throughout the whole zoom range and from wide-opened, here are some various samples (Click to download in Large size, EXIF preserved):-
(18mm, f/3.5)
(18mm, f/5.6)
(18mm, f/6.7)
(21mm, f/4)
(21mm, f/8)

(28mm, f/4)

(36mm, f/4.5)
(36mm, f/6.7)
(36mm, f/8)
(40mm, f/7.1)
(53mm, f/6.3)
(100 mm, f/5.6)
(135mm, f/5.6)
It can be noted that the extreme corner softness is only existent at the widest side at 18mm. From 21mm and onwards, the effect is considerably eliminated and is not that noticeable. Distortion is significantly decreased, too.
In general, images produced are with good colours and contrast. Resolution is high throughout the frame except at the extreme focal ends, i.e., 18mm and 135mm. I do note that my lens' optics are perfectly centred by judging from the vignetting pattern, nevertheless. Maybe I am just lucky enough.
The flare resistance is superb. Look at this:-

The bokeh of this lens is not bad, look at these two (and also some of the above samples with a blurred background):-

Round bokeh of highlights can be seen.
Btw, why to use Live View with a DSLR? (I can see many DSLR beginners have been doing this!) Why not just use a K-01 if so?! :-o
There is one minor problem of this lens (or maybe the Pentax DSLR system in general), it is that it has a slight underexposure tendency, a +0.3/0.5 exposure compensation would usually cure it.
Besides, the Pentax SR system for tele-lens is proven to be ineffective, once again. I have got quite some blurred photos when shot at 135mm, just because the lens speed is slow but SR didn't help:-
All in all, I am quite satisfied with my copy of the DA18-135. It seems that my lens has far better performance than what is shown in the various measurbation tests and I do believe that it is a lens that performs well in real world but not so for measurbations. This maybe owing to the inconsistency quality control (or lenses are actually classified into different quality classes and batches - mine was purchased separately). The other possibility is that the optical design of this lens is not optimised for close range objects, where a test chart is placed and shot.
At the end of the day, this travelling zoom will not give you stellar optic quality which primes could give which is well expected, After all, let's see if my "favourable" review this time could retrieve the confidence of some potential buyers of this lens and maybe also for Pentax the brand as well! ;-D
Related:-
Interview with the Optical Engineer/Designer of the DA 18-135 Lens
Subscribe to:
Posts (Atom)